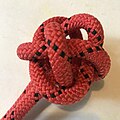
Chinese button knot
| Chinese button knot | |
|---|---|
 tightened Chinese button knot | |
| Category | Decorative |
| Category 2 | Stopper |
| Related | diamond knot, Celtic button knot |
| Typical use | clothing button |
| ABoK | #599 |
The Chinese button knot is essentially a knife lanyard knot where the lanyard loop is shortened to a minimum, i.e. tightened to the knot itself. There emerges therefore only two lines next to each other from the knot: the beginning and the end. The knot has traditionally been used as a button on clothes in Asia, thus the name.
The Chinese Button Knot is worn throughout China on underwear and night clothes. Buttons of this sort are more comfortable to lie on and to rest against compared to common bone and composition buttons, and they cannot be broken even by the laundry.
A Chinese tailor ties the knot without guide, flat on his table. But one may be more quickly and easily tied in hand by a modification of the sailor’s method of tying his knife lanyard knot (#787). The two knots are tied alike, but they are worked differently.
Tying
[edit]The basic chinese button knot (ABOK #599 on one string) is usually tied with a carrick bend that attaches the two ends as a first step. This results then in a knife lanyard knot (ABOK #787) where the loop part can be sized and used as a button hole, while the knot part can be used as a button.
- Tying starts with a diagonal carrick bend (two colors for clarity)
- Ends continue around and over the standing part on the other side
- Ends under the knot and up through the middle hole together
- Tightened to a spherical basket weave, ends opposite standing parts
Below is the ABOK description, and several video demonstration references: [2][3][4]
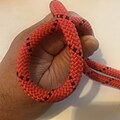
To tie the button: Take a piece of banding about three feet long, middle it, and lay it across the left hand as pictured. Take the end from the back of the hand and make a right turn around the tip of the left thumb. Bend the left thumb and hold the turn against the standing part of the cord. Take the left end and tuck it to the right, under the first end and then to the left under the upper center part of the knot. The knot should now have a regular over-one-and under-one sequence throughout.
Still keeping the knot in hand, tuck both ends under the rim and up through the center compartment of the knot as pictured in the
third diagram.
Remove the knot from the hand, turn it completely over, and allow the two ends to hang down between the two middle fingers of the left hand as drawn in the fifth diagram. Work out the surplus material of the loop without distorting the knot and arrange it...— The Ashley Book of Knots[1]
There is however a tying method that does not require a carrick bend, rather a slip knot as a first step, and does not produce a lanyard loop that needs to be reduced when used as a button. This method provides just the button, a spherical basket weave knot, in the style of Turk's head knot.
- Starting with a slip knot with the slip end at top right.
- The slip end over the left side up and through slip for 2 symmetrically interwoven slips.
- One of the ends continues to bend and is pushed down the nearest triangular hole at center
- The other end continues to bend and is pushed down the other triangular hole at center
- The resulting flat flower has 4 symmetric petals and two stems
- Tightening like an umbrella (not like a wine glass), and pulling the middle out
- With the middle point at top, it becomes a 9 bulge sphere.
A third way to tie this knot [5] starts with two loops almost like tying the celtic button knot, except for the curvature change at the center which results in the way the ends exit the knot; at opposite sides for celtic, at the same side here.
- one overhand loop
- another partially overlapping underhand loop behind
- third loop bends back an weaves
- fourth loop completes the symmetry
- the middle point at top pulled out
- tightened to a 9 bulge sphere
The resulting knot in both tying methods (slip-knot method and two-loops or WhyKnot method) is ABOK #600 which is similar to knife lanyard knot but the loop part is reduced to the top center bulge on its surface.
"The top center part of the present knot has retreated from the surface. This should now be forcibly pricked to the surface and the surrounding parts tightened to hold it in place. This is the final form of the common chinese button knot. By counting it will be found that the knot has 9 surface parts."
Which triangular hole at the S formed/back bent top center each end is tucked through in both tying methods makes a difference:
- tucking through the one at near side of the center as indicated by red lines in this image gives ABOK #600 the 8 part knot, of which the common chinese button knot is a version with a 9th surface part,
- tucking through the one at opposite side as indicated by red lines in this image gives ABOK #787 the knife lanyard knot but with a retreated loop.
- Chinese button knot Doubled ABOK #601 flat, with one end from outside all the way
- Chinese button knot Doubled ABOK #601 flat, with one end from outside all the way, ends passing each other before reversing
- Chinese button knot Doubled ABOK #603 flat, with each end from following from outside
- Chinese button knot Doubled ABOK #601 tightened version
See also
[edit]- Tangzhuang, a jacket which often incorporates knotted buttons
References
[edit]- ^ a b Ashley, Clifford W. (1944). The Ashley Book of Knots, p.101. Doubleday. ISBN 0-385-04025-3.
- ^ How to Make a Diamond Knot (Lanyard Knot) by ProfessorParacord via YouTube
- ^ The Paracord Weaver: Chinese Button or Lanyard Knot via YouTube
- ^ 徒手鈕扣結-初級基本結【一線生機】 (Button Knot) via YouTube
- ^ How You Can Tie The Chinese Button Knot -by whyknot via YouTube
- ^ Ashley, Clifford W. (1944). The Ashley Book of Knots, p.103. Doubleday. ISBN 0-385-04025-3.


 French
 Deutsch


